How to Use Cookie Cutters and Stamps Together | Simple Guide
Learn the practical, easy method for getting clean stamped cookies using cookie cutter and stamp combinations. Two methods for real fixes to common problems.
TL;DR (Too Long; Didn’t Roll)
Our cutters + stamps are a matched set, but they come as two separate pieces—you just use them together.
There are two totally valid orders:
- Stamp → Cut (our go-to)
- Cut → Stamp (great when you want to “place” the design first)
If things are sticking: chill the dough, dust lightly, and make sure your stamp/cutter is bone dry (water = instant glue).
What This Post Is (and Isn’t)
We’re not cookie scientists. We’re a small shop making cutters + stamps and sharing what’s worked in our kitchen (and what absolutely did not). This is the practical, normal-person method for getting clean stamped cookies using a cutter + stamp combo.
What You’ll Need
The Basics
- Cookie dough that holds its shape (most sugar cookie dough works great)
- Cookie stamp
- Cookie cutter
- Baking sheet + parchment
About Rolling the Dough (A Real-Life Note)
A rolling pin is nice… in theory. In practice, if rolling pin life isn’t working for you, you’re not alone.
What we’ve used to flatten dough enough for stamping:
- A rolling pin (when we’re feeling fancy)
- The flat side of a meat mallet
- Your fist (honestly: effective)
- Anything clean + flat that helps you get a wide, even-ish surface
The goal isn’t perfection. It’s just: flat enough + even enough for the stamp to do its thing.
Helpful Extras (Optional, but handy)
- Flour / powdered sugar / cornstarch (for anti-stick dusting)
- A small brush or toothpick to clean dough/flour out of details
- Fridge time (seriously underrated)
The Two Ways We Do It (Pick Your Favorite)
Since our stamp + cutter combos are designed to fit together, both orders work. We’ve done both. Here’s how they compare.
Option A: Stamp → Cut (Our Usual Move)
This tends to give cleaner edges because you’re cutting after the dough has already been pressed/imprinted.
Steps
1) Flatten the dough
Roll it, press it, bonk it gently with a meat mallet—whatever gets you a usable surface.
2) Lightly dust the stamp (if needed)
If you overdo it, flour can pack into the details. Keep it light.
3) Press the stamp straight down
Firm pressure. No wiggle. Then lift straight up like you’re defusing a tiny cookie bomb.
4) Cut around the stamped area
Now cut the shape around the imprint.
5) Chill before baking (optional, but often clutch)
If the dough is warm or soft, chill the cut cookies on the tray for 10–20 minutes before baking.
Why we like this: it’s fast, forgiving, and the edges tend to look a bit more crisp.
Option B: Cut → Stamp (When You Want More Control)
This is great when you want to see the cookie shape first and then decide exactly how the stamp lands inside it.
Steps
1) Flatten dough, then cut shapes
Cut your cookies first and leave them where they are (parchment is your friend).
2) Stamp onto the cut shape
Press straight down. Use controlled pressure—too much can squish edges.
3) Chill if the shape starts to distort
If edges look a little sad after stamping, pop them in the fridge for 10–20 minutes before baking.
Why we like this: it’s easier to “place” the design exactly where you want it.
Which One Should You Use?
Honestly: whichever feels easiest for you.
If you want our quick opinion:
- Stamp → Cut if you want cleaner edges and a smoother workflow.
- Cut → Stamp if you want more control over placement and you’re willing to be a little gentler with pressure.
Common Problems (And the Fixes We Actually Use)
“My stamp is sticking to the dough”
Try this combo:
- Chill dough for 10–20 minutes
- Dust lightly (flour / powdered sugar / cornstarch)
- Press down + lift straight up (no rocking)
- Make sure the stamp is DRY (if it’s even a little wet, it’ll cling)
“My cutter is sticking / dragging / pulling the dough”
- Make sure the cutter is dry (water = stick city)
- Dip the cutter edge lightly in flour if you need to
- If the dough is warm, chill it first—warm dough is extra grabby
”My details look blurry or shallow”
- Press more firmly (even pressure matters)
- Chill the dough before stamping
- Clean out the stamp grooves (flour buildup can make details mushy)
- Try a slightly thicker dough sheet next round
”My edges warped after stamping”
Usually warm dough + heavy pressure.
- Chill after stamping
- Or switch to Stamp → Cut, which can help keep edges neater
Cookie Stamp Quick Reference
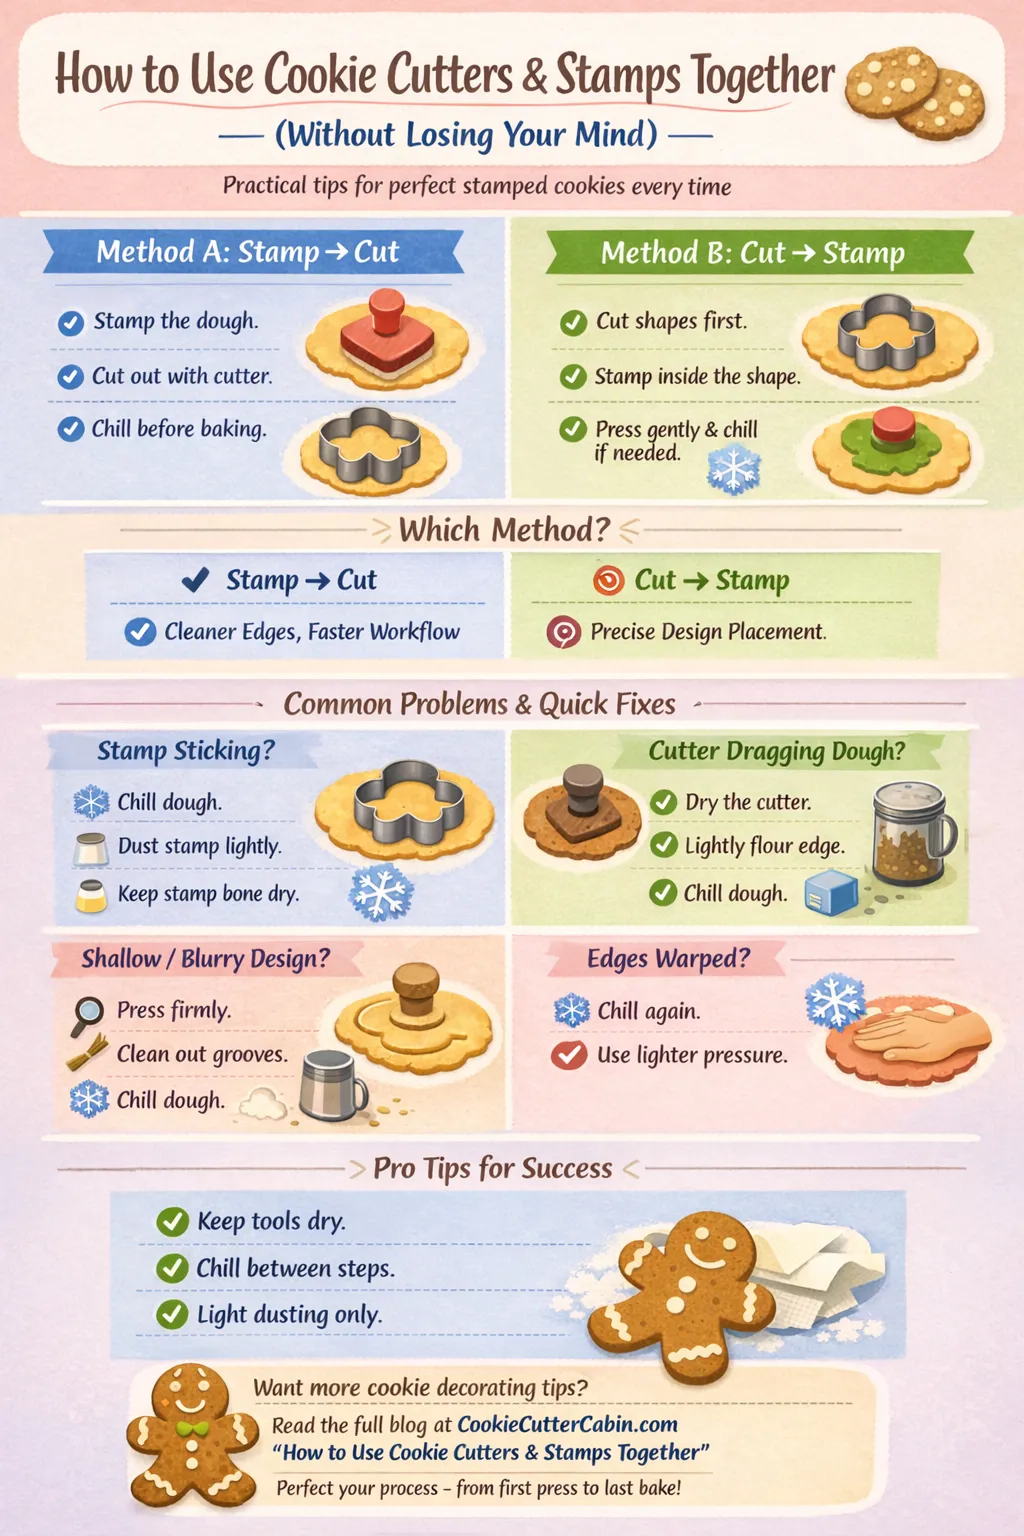
This handy infographic covers the key points for both stamping methods and quick fixes for the most common issues you’ll run into.
Stamping Order + Troubleshooting in 10 Seconds
Stamp → Cut
- Cleaner edges
- Faster batch workflow
Cut → Stamp
- More control
- Gentle pressure helps
Quick Fixes:
- Sticking stamp? Chill + dust + lift straight up + dry stamp
- Dragging cutter? Chill + dry cutter + light flour
- Blurry detail? Chill + firmer press + clean grooves
- Warped edges? Chill + lighter pressure (or switch order)
Soft Close
If you try this and your cookies do something weird, congrats—you’re officially doing it correctly. That’s the process. 😄
Want to see these techniques in action? Check out our St. Patrick’s Day rum cookie dough recipe for a seasonal batch that uses shamrock stamps. For easy decorating ideas once your cookies are baked, check out our shamrock cookie decorating guide. Or start with our go-to sugar cookie dough if you need a base recipe.
Browse our full collection of cookie cutters and stamps on Etsy.
The main win is learning which order and pressure works best in your kitchen, with your dough, on your day.
And remember: we’re always here if you have questions about your specific cutters or stamps. Drop us a line!
Share this post:
Related Posts
The Best 2026 Cookie Decorating Trends With Cookie Cutters
Discover the cutest cookie cutter decorating trends for 2026, from minimalist designs to bold cookie stamp textures and everything in between.
The Best Go-To Sugar Cookie Dough Recipe For Cookie Cutters & Stamps
Discover our top-rated sugar cookie dough recipe perfect for cookie cutters and stamps. Get clean edges, crisp details, and soft cookies every time with step-by-step instructions.
Cookie Stamps for Beginners: Everything You Need to Know
Learn how to use cookie stamps for beginners. Discover the basics, step-by-step techniques, and pro tips for clean, professional-looking stamped cookies.